Now I need help with .dds files and mesh files

Ahmose

Member
Joined
Jun 16, 2012
Messages
38
.DDS FILE WOOOO

I am slowly but surely getting the hang of this modding thing.

In the last couple days I've started playing with editing textures and .dds files, although I have to convert them to .jpg before I can play with them as IrfanView renders them weirdly (only shows the parts of the clothing item that correspond to a certain palette part [for example, color 2 on the reinforced jumpsuit top])

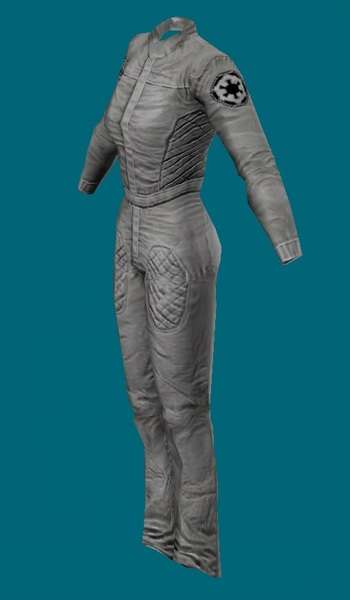
I managed to pull out the .dds file for the top of the reinforced jumpsuit, threw an Imperial insignia on it, and it works in game:


HOWEVER

When I go to color the jacket in a brown, black, olive drab, etc, the patch takes that color. Now, I am guessing that Irfanview rendered the .dds file as only the color 2 part of the item for a reason, and I am hoping to recreate the layering of the .dds file so that no matter what I color the jumpsuit, the patch remains that white color.

Can it be done? If so, how? (I have GIMP, though for some reason it can't open the .dds files I extract from TRE Explorer)

MESH FILES WOOOOO

I am also trying to modify the Imperial Rank Badge Mod or find out a way to open the actual mesh file for the affected shirts so I can change the arrangement of the rank plate and code cylinders around some. Is this possible?

In addition, would it be possible to be able to use a minimum number of shirts to cover the maximum number of ranks by assigning different rank combinations to different shirt colors? Looks like that is what's happening here:

[video=youtube]https://www.youtube.com/watch?v=Ob_hK2EcD3Y[/video]

But I await the expertise of people far more skilled than I. I look forward to hearing from you!
 

Ahmose

Member
Joined
Jun 16, 2012
Messages
38
RE: Now I am playing with .dds files and mesh files

TWO OTHER QUESTIONS WEEEEE

1) I have brought in the DLT-19 from NGE to swap out the DLT-20, but I am getting crashes whenever the game sees a DLT-20. Anyone have any potential quick fixes?

2) I'd like to bring in the Veers Helmet and Veers Chestplate and I found the Veers .iff file that calls the individual .sat files (as there are no individual Veers Helmet/Chestplate .iff files), but the file chain is freaking ginormous. How much of the chain do I have to bring in, and since I am renaming .sat files and not the .iff do I have to go into the .iff and change the .sat file names so everything gets called up properly?
 

Timbab

Administrator
Staff member
Administrator
Moderator
Joined
Oct 6, 2010
Messages
1,057
Location
Magna Germania
DDS: Get a DDS plugin for GIMP. You're seeing only the part that's affected by the palette due to the alpha channel layer (white = affected, black = unaffected). So what you want to do, is make the newly added part that you added, black on the alpha. Best is to copy it, make the copy of it purely black with no details, then copy that over to the alpha.

I'd make screenshots to show it in photoshop, but still haven't restored my adobe stuff, since the crash.

Palette/ranks Question: How do you mean change the ranks, how would different ranks look like? The only thing you can change might be palette, but how to do it, I wouldn't be able to answer at the top of my head right now.

MESH/MGN: Forget thinking about it for now. No clean way to do MGN format mesh changes atm, only .msh (which are only static models)


OTHER QUESTIONS

1) What did you swap exactly? What which files?

2) You need to follow the link chain. See which files are used by every file that's needed. You can either rename the top link file, like a .sat or an .apt in some cases and then simply cover over the rest without renaming, or just copy the MGN/MSH files over and rename those, while leaving everything else the same, etc.

Problem with NGE ports, you can't simply copy and rename the top link file and be done with it, because it will look for files that aren't there then, so you'll need to add those, it's just a matter of getting them all. If you'd swap a preCU item with a preCU item, you could simply swap the top link file and call it a day, due to it just grabbing it in the tre file.
 

Ahmose

Member
Joined
Jun 16, 2012
Messages
38
I brought in the wp_rifle_deathtrooper.iff and renamed it wp_rifle_dlt20.iff.
[hr]
Here is the file I am trying to modify, I can't get GIMP's dds plugin to work and paint.net says there's only the 1 layer.

bodysuit_s13_top.dds
 

Timbab

Administrator
Staff member
Administrator
Moderator
Joined
Oct 6, 2010
Messages
1,057
Location
Magna Germania
Only way to edit .DDS correctly, is with Photoshop, GIMP (both with plugins) or something that fully supports .DDS files.

Can't get around it.

But there is only one layer, always (If you open it, you can save it with multiples, but the end result if you open it again will be only one layer again), you have to look into the Channels, the Alpha channel handles whatever .pal/.eft stuff you have in the .sht.

@ your gun problem, you sure you moved everything correctly?
 

Ahmose

Member
Joined
Jun 16, 2012
Messages
38
I had a friend convert the .dds file to a .png file and I have opened it up in GIMP, the only channels I see are red, green, and blue, no alpha. I could probably make one, if I did that would I just put a black spot in the area I don't want the palette to touch then throw the patch on top?

Will a converted .dds to .png file work for getting that patch issue resolved?
 

Timbab

Administrator
Staff member
Administrator
Moderator
Joined
Oct 6, 2010
Messages
1,057
Location
Magna Germania
No you need to edit the .dds itself, pretty sure converting it will kill the alpha, since it's a flat image then.

You could take the .png and add a alpha channel (if done right), but then it'd need to be exported/saved as a .dds without any tricking around.

Try to get the plugin to work, or a different one, look around.
 

Tonberry

Inactive Staff
Joined
Aug 30, 2010
Messages
372
1. Open your texture in photoshop/gimp, whether it be an existing DDS or a new file entirely.

2. Make the edits to the texture, in this case adding the insigina.

3. If it doesn't have an alpha add one in the channels panel.

4. Go back to your main image, select it all and copy, then go back to the alpha channel and paste.

5. You'll now have a grayscale version of the original texture in the alpha channel, the reasoning for this is just to use it as a guide if you don't have the original alpha or are working with a new texture entirely. You can skip the these to steps if you have an original alpha to work with.

6. Generally white will designate the primary colour and black the secondary colour (trims, highlights etc).

I haven't messed with how colouring behaves but I would assume on items with a single colour the black parts of the alpha will be excluded from being affected by the palette, but it's possible this will vary depending on the item as occasionally you'll find things in the client which don't match up with everything else.

7. Once you think the alpha is right you can export. Remember if the colours end up the wrong way around ingame you can go back and invert the alpha channel to fix it.

8. To export make sure you use DXT5 Interpolated Alpha. I don't recall what options GIMP gives you but this is what you'll want when using PS and the texture has an alpha channel.


This is basically what I said on IRC but hopefully more clear and condensed for reference.
 

Timbab

Administrator
Staff member
Administrator
Moderator
Joined
Oct 6, 2010
Messages
1,057
Location
Magna Germania
Can't help you until I setup Photoshop for mod related stuff again.

But beyond all else, you need to have a working gimp or photoshop setup so you can edit .dds.
 

Ahmose

Member
Joined
Jun 16, 2012
Messages
38
I got PS working, but I don't think I can make this work because the clothing I'm using has 2 palette colors, so no matter what once we do a black on black the patch will be consumed by darkness.

On to another hair brained scheme:

I have replaced the .sat and .lmg files of the short sleeved shirt with the NPC scout trooper armor. I now look like this:


However, you can tell there is some serious clipping going on with the model. Furthermore, to people without the modified files I am butt naked!

Is there any way to do the following:

-Clean up the clipping so hair, skin, etc don't show through the "armor"
-Force an override so that folks with the mod only see the "armor," but folks without the mod see the rest of the person's clothes
 

Timbab

Administrator
Staff member
Administrator
Moderator
Joined
Oct 6, 2010
Messages
1,057
Location
Magna Germania
Pretty sure the clipping exists, because the mgn doesn't take the blender for each body piece into account, meaning, if you make the character fat, the armor will remain the same and won't adjust even a bit, correct?


Can't get into too much depth because I never really model swapped.

Only things I do know for sure, if you have clothes on so that others don't see you naked, you'll have clipping regardless, unless you swap each piece individually. You simply don't have the modifiers (I don't think) for a whole armor set to blend the whole armor, matching the body.

Actually, thinking about it, you might be able to do it somehow, but you'd need to really dig into files and see how it's done for NPCs. You'll find 'wearables' information for NPCs in the .CDF (Client Data Files), I'd assume the scout would be there too.


Edit:

I assume you used "scout_trooper.lmg" and "scout_trooper.sat" from patch 00.

Unsure how those are used, if you look at the 'shared_dressed_scout_trooper_m.iff' from patch 01, you'll see that it links to the human male .sat and then attaches the Client Data File that handles the armor, which is, each armor piece individually.

So maybe, you can attach the CDF to the shirt object .iff, by basically copying the way it's linked in the 'shared_dressed_scout_trooper_m.iff', but I'll assume doing a simply relink to the same .cdf might cause problems because it links more than just wearables, so delete all other nodes except the WEARMESH/MESH, either with their own FORM or not. See what works, if it works even.


Edit 2:

Regarding the color thing, aren't there files with more than 2 colors? Let me know, if yes, either they split the texture up so it has multiple alphas, or they handle the palette differently.

A not so clean workaround is, if you kill the second color and recolor that part manually in photoshop. You do the cutting by looking at a .sht file that only has one palette and 'fixing' the one you want to modify to that order. No idea if that'll cause a crash, because it looks for a palette.

Edit 3: Yeah nevermind, they handle it with split texture, example is the pants_s27. Buckle has index_color_3, 2while the rest is 1 and 2. You'd need to redo the UV then, for that.
 

Ahmose

Member
Joined
Jun 16, 2012
Messages
38
I did use scout_trooper.

Can you walk me through the CDF attaching? I assume I would just pull out the .iff and not the file tree, and then go into the .iff with notepad?
 

Timbab

Administrator
Staff member
Administrator
Moderator
Joined
Oct 6, 2010
Messages
1,057
Location
Magna Germania
No, no. You edit .iff files with tre Explorer.

I'll give the .CDF attaching thing a shot tomorrow, forgot about this post. I'll see if that works.

You should really just simply swap a regular set of armor with wearable scout armor. You won't have any problems then.

You do this by taking all the armor_scout_trooper_ .lmg files and renaming them to whatever armor you want to replace, for example bone armor would be armor_bone_ .lmg.

So for the helmet, as an example:

armor_scout_trooper_helmet_m.lmg
to
armor_bone_s01_helmet_m.lmg

There is a 'set' for most races, so you can exclude like _bth (bothan) for example, by simply not swapping those.
 
Top Bottom